Sync Level.io Security to Drata
The Problem
If you’re using Drata for compliance automation and Level.io for device management, you’ve probably noticed there’s no native integration between them. Drata has a handful of built-in MDM integrations, but Level.io isn’t one of them. So if you want device compliance data flowing into Drata automatically, you’re on your own.
Drata does offer a custom MDM with Apiv2, though, which lets you push device data through their API. The missing piece is something to sit in the middle, pull devices from Level.io, match them to Drata personnel, and push the results.
How It Works
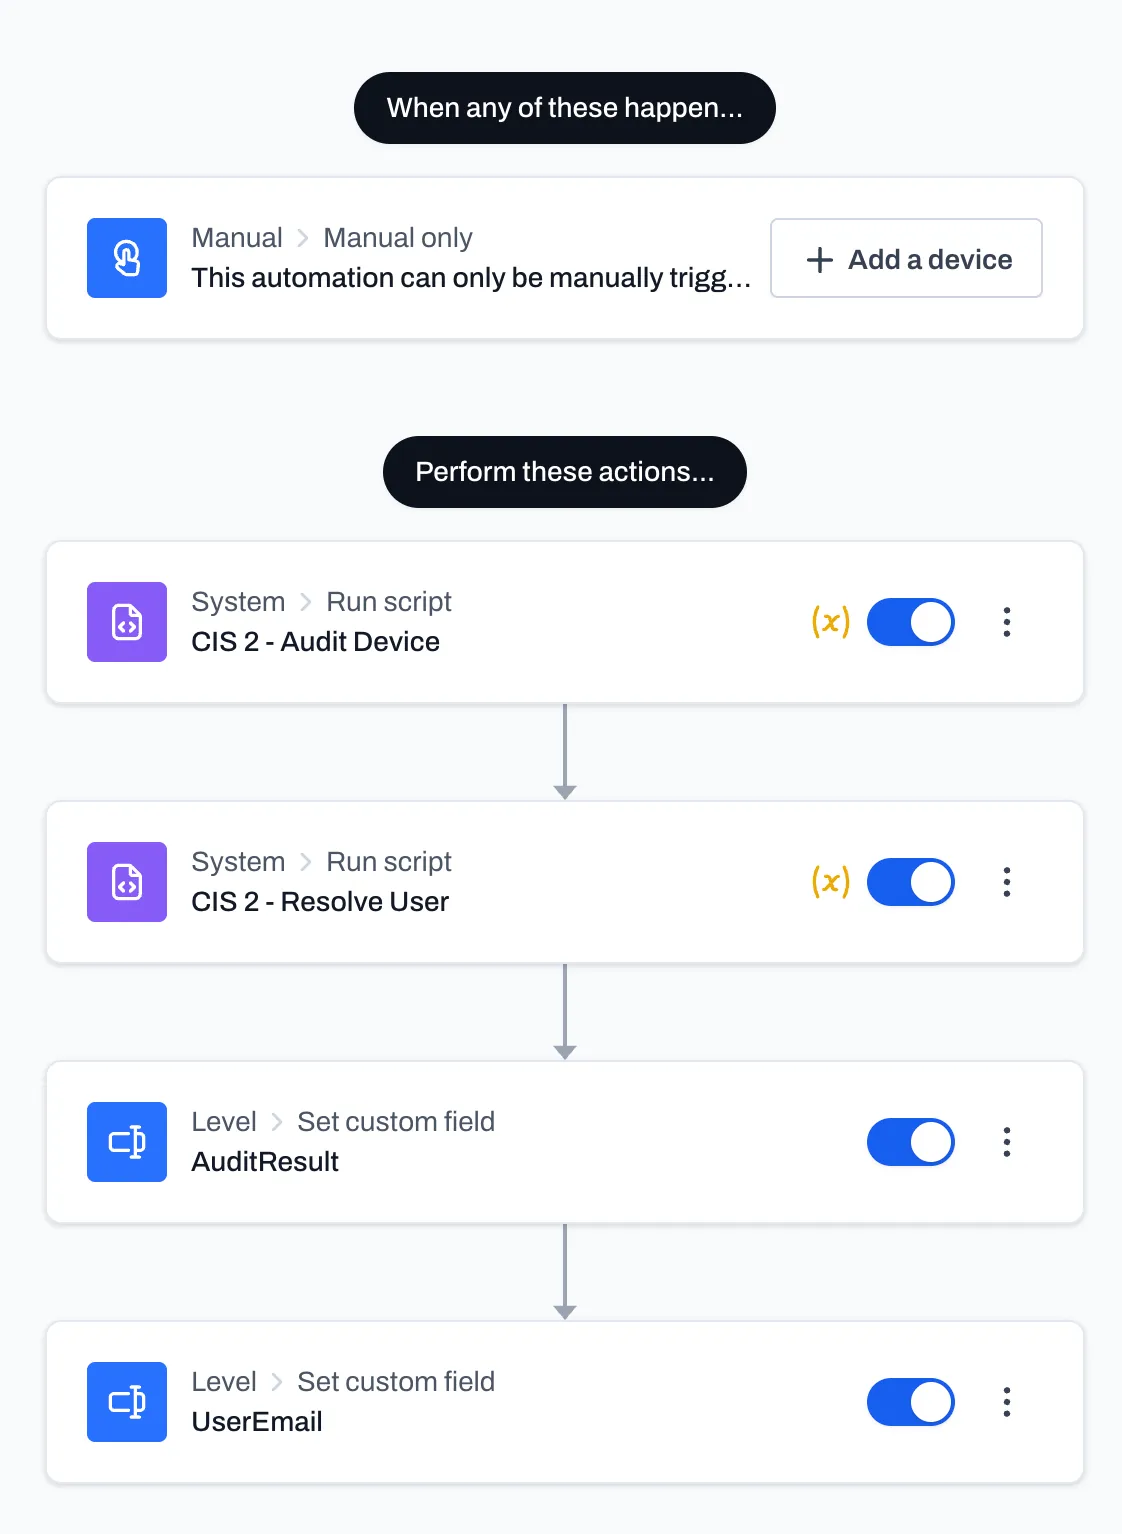
In level.io we set up an automation that:
- Runs powerShell script(s) on each endpoint, collects device compliance data, user email, and writes it to Level.io as custom field values
- An n8n workflow runs on a schedule, pulls personnel from Drata and devices from Level.io, matches them by email, and POSTs the device payloads back to Drata’s custom connection endpoint
The PowerShell script handles the “what does this device look like right now” part. The n8n workflow handles the “get it into Drata” part.
What This Script Does
This PowerShell script runs on endpoints (via Level.io) and collects the compliance data Drata cares about: antivirus, firewall, disk encryption, screen lock, password managers, and OS info. It outputs a flat JSON object that gets written to Level.io custom fields, which the n8n workflow then picks up and pushes to Drata.
It’s designed to run as SYSTEM, which is what Level.io (and most RMM tools) will do by default.
Password Manager Detection
Drata wants to know if your users have a password manager. The tricky part is that “having a password manager” can mean an installed desktop app or a browser extension — and a lot of people only use the extension.
$knownPMs = @('1Password','Bitwarden','LastPass','Dashlane','KeePass','Keeper','NordPass','RoboForm')

$chromeExtIds = @{
  'aeblfdkhhhdcdjpifhhbdiojplfjncoa' = '1Password'
  'nngceckbapebfimnlniiiahkandclblb' = 'Bitwarden'
  'hdokiejnpimakedhajhdlcegeplioahd' = 'LastPass'
  'fdjamakpfbbddfjaooikfcpapjhoafdg' = 'Dashlane'
  'oboonakemofpalcgghocfoadofidjkkk' = 'KeePass'
  'bfogiafebfohielmmehodmfbbebbbpei' = 'Keeper'
  'oehpjpccmlhoahkgijgkfbfbmpinnlkn' = 'NordPass'
}
First, we check installed apps via the registry uninstall keys (both 64-bit and WOW6432Node):
$installed = Get-ItemProperty 'HKLM:\SOFTWARE\Microsoft\Windows\CurrentVersion\Uninstall\*',
           'HKLM:\SOFTWARE\WOW6432Node\Microsoft\Windows\CurrentVersion\Uninstall\*' -EA SilentlyContinue
$pmApps = @($installed | Where-Object { $n = $_.DisplayName; $n -and ($knownPMs | Where-Object { $n -match $_ }) } | ForEach-Object { $_.DisplayName })
Then we scan Chrome and Edge extension folders for every user profile on the machine. The extension folder name is the Chrome Web Store extension ID, so we can match it against our known list:
$userProfiles = Get-ChildItem 'C:\Users' -Directory -EA SilentlyContinue | Where-Object { $_.Name -notmatch '^(Public|Default)' }
foreach ($profile in $userProfiles) {
  $chromeBase = Join-Path $profile.FullName 'AppData\Local\Google\Chrome\User Data'
  $edgeBase = Join-Path $profile.FullName 'AppData\Local\Microsoft\Edge\User Data'

  foreach ($browserPath in @($chromeBase, $edgeBase)) {
      if (-not (Test-Path $browserPath)) { continue }
      $browserProfiles = Get-ChildItem $browserPath -Directory -EA SilentlyContinue |
          Where-Object { $_.Name -eq 'Default' -or $_.Name -match '^Profile \d+' }

      foreach ($bp in $browserProfiles) {
          $extPath = Join-Path $bp.FullName 'Extensions'
          if (-not (Test-Path $extPath)) { continue }
          foreach ($ext in (Get-ChildItem $extPath -Directory -EA SilentlyContinue)) {
              if ($chromeExtIds.ContainsKey($ext.Name) -and $pmApps -notcontains $chromeExtIds[$ext.Name]) {
                  $pmApps += $chromeExtIds[$ext.Name]
              }
          }
      }
  }
}
$pmEnabled = $pmApps.Count -gt 0
This covers both Chrome and Edge (same Chromium extension directory structure), across all user profiles and all browser profiles. If someone has Bitwarden installed as a Chrome extension on their second browser profile, we’ll find it.
Antivirus
$av = Get-CimInstance -Namespace 'root\SecurityCenter2' -ClassName AntiVirusProduct -EA SilentlyContinue
$avProducts = @()
$avEnabled = $false
foreach ($p in $av) {
  $bytes = [BitConverter]::GetBytes($p.productState)
  $enabled = ($bytes[1] -band 0x10) -ne 0
  if ($enabled) { $avEnabled = $true }
  $avProducts += $p.displayName
}
The productState bitmask is one of those things Microsoft has never properly documented. We use [BitConverter]::GetBytes to pull the second byte and check bit 4 (0x10) for the enabled flag. If any AV product is active, the device passes.
This uses SecurityCenter2, which works on workstations. If you’re running this on Windows Server, you’ll need to fall back to checking services directly since that WMI namespace doesn’t exist on server SKUs.
Firewall
$thirdPartyFw = Get-CimInstance -Namespace 'root\SecurityCenter2' -ClassName FirewallProduct -EA SilentlyContinue
if ($thirdPartyFw) {
  $bytes = [BitConverter]::GetBytes($thirdPartyFw[0].productState)
  $fwEnabled = ($bytes[1] -band 0x10) -ne 0
  $fwExplanation = $thirdPartyFw[0].displayName
} else {
  $profiles = Get-NetFirewallProfile -EA SilentlyContinue
  $fwEnabled = ($profiles | Where-Object { $_.Enabled }).Count -gt 0
  $fwExplanation = 'Windows Firewall'
}
This checks for third-party firewalls first (via SecurityCenter2), and only falls back to Windows Firewall if nothing else is registered. The fwExplanation field is nice for auditors — instead of just “yes firewall is on,” you can tell them which one.
Disk Encryption (BitLocker)
$bl = Get-BitLockerVolume -MountPoint 'C:' -EA SilentlyContinue
$encEnabled = $bl -and $bl.ProtectionStatus -eq 'On'
Short and sweet. We only check C: because that’s what Drata cares about. If protection isn’t on, it fails. This needs to run elevated (SYSTEM is fine).
Screen Lock
This is the one that’s annoying to get right, because the script runs as SYSTEM but the screen lock settings live in the active user’s registry hive.
$activeUser = (Get-CimInstance Win32_ComputerSystem).UserName
$screenLockEnabled = $false
$screenLockTime = 0

if ($activeUser) {
  $sid = ([System.Security.Principal.NTAccount]$activeUser).Translate(
      [System.Security.Principal.SecurityIdentifier]).Value
  $rel = 'Software\Policies\Microsoft\Windows\Control Panel\Desktop'
  $hku  = "Registry::HKEY_USERS\$sid\$rel"
  $hklm = "HKLM:\SOFTWARE\Policies\Microsoft\Windows\Control Panel\Desktop"

  $val = (Get-ItemProperty -Path $hku -Name 'ScreenSaveTimeOut' -EA SilentlyContinue).ScreenSaveTimeOut
  if ($null -eq $val) { $val = (Get-ItemProperty -Path $hklm -Name 'ScreenSaveTimeOut' -EA SilentlyContinue).ScreenSaveTimeOut }

  if ($val -and $val -ne 'NOT SET') {
      $screenLockTime = [int]$val
      $screenLockEnabled = $screenLockTime -gt 0
  }
}
We resolve the currently logged-in user’s SID, then read their HKU hive directly. GPO-pushed settings land in the policy path, so we check the user’s policy key first, then fall back to the machine-level policy. If neither has a timeout set, or nobody’s logged in, it reports as disabled — which is the safe default for compliance.
OS / Hardware
$os = Get-CimInstance Win32_OperatingSystem
$serial = (Get-CimInstance Win32_BIOS).SerialNumber
$model = (Get-CimInstance Win32_ComputerSystem).Model
Drata uses the serial number to uniquely identify devices. Make sure your machines actually have serial numbers set in BIOS — VMs sometimes don’t, or they’ll all report the same one if you’re cloning images.
Output
Everything gets bundled into a JSON object that matches Drata’s required schema:
$result = @{
  serialNumber           = $serial
  model                  = $model
  platformName           = 'WINDOWS'
  platformVersion        = $os.Version
  antivirusEnabled       = $avEnabled
  antivirusExplanation   = @{
    antivirusApps = $avProducts
  }
  firewallEnabled        = $fwEnabled
  firewallExplanation    = $fwExplanation
  encryptionEnabled      = $encEnabled
  autoUpdateEnabled      = $true
  screenLockEnabled      = $screenLockEnabled
  passwordManagerEnabled = $pmEnabled
  passwordManagerExplanation = @{
    passwordManagerApps = $pmApps
  }
  encryptionExplanation = @{
    bootPartitionEncryptionDetails = @{
      partitionFileVault2Percent = if ($bl) { $bl.EncryptionPercentage } else { 0 }
      partitionFileVault2State   = if ($bl -and $bl.ProtectionStatus -eq 'On') { 'ENCRYPTED' } else { 'NOT_ENCRYPTED' }
      partitionName              = if ($bl) { "$($bl.MountPoint) (Boot Partition)" } else { 'C: (Boot Partition)' }
    }
  }
}
The autoUpdateEnabled is hardcoded to $true here. If you’re managing updates via WSUS, Intune, or GPO, you already know the answer. If you want to actually check, you can query the HKLM:\SOFTWARE\Policies\Microsoft\Windows\WindowsUpdate\AU registry key — but in most managed environments it’s just noise.
The -Compress flag is important. This JSON gets stored as a Level.io custom field value, and the n8n workflow parses it back out later. Keeping it compressed avoids any weirdness with line breaks in custom field storage.
The PowerShell Script
The script runs on your endpoints and collects the compliance data Drata cares about: disk encryption, OS version, firewall status, etc. It bundles this into a JSON payload and writes it to Level.io custom fields for the device.
This is the glue that makes the whole thing work. Without it, Level.io has device info but not in the shape Drata expects. The script bridges that gap at the source.
I’ve linked to the full script in the gist below.
Getting Logged In User
Before I forget, we also need email to link the user to their device. That’s really easy in Windows. Hopefully you’re using a non-local account. I put a script in the same gist below that will fetch the logged in user’s email so you can link it to Drata.
The n8n Workflow
Here’s the simplified flow:
Schedule Trigger → Drata Get Personnel → Build Personnel Map
  → Level.io Get Devices → Split Devices
  → Level.io Get Custom Values (per device)
  → Build Device Payload → POST to Drata
Fetching Drata Personnel
First, we pull all current employees and contractors from Drata’s API. The HTTP Request node handles cursor-based pagination automatically. A Code node then flattens all the paginated results into a hash map of email → personnelId for fast lookup later.
const personnelMap = {};
for (const item of $input.all()) {
  for (const person of item.json.data) {
    personnelMap[person.user.email] = person.id;
  }
}
return { json: { personnelMap } };
This beats the alternative of doing a .find() on an array for every single device. If you have a few hundred personnel and a few hundred devices, that’s a lot of unnecessary iteration.
Fetching Level.io Devices
Next, we hit the Level.io API to get all devices, split the response array into individual items with a SplitOut node, and then for each device, fetch its custom field values. The HTTP Request node handles the per-item execution automatically — no loop needed.
I added batching (5 requests per second) on the custom values fetch to avoid hammering Level.io’s API. If you have a smaller fleet you can probably crank this up or remove it entirely.
Building the Payload
This is where it all comes together. For each device, the Code node pulls the email and device compliance JSON out of the custom fields, matches the email against the Drata personnel map, and builds the final payload.
const results = [];
const { personnelMap } = $('Build Personnel Map').first().json;

for (const item of $input.all()) {
  const customFields = item.json.data;
  if (!customFields?.length) continue;

  let userEmail = null;
  let device = null;

  for (const { value } of customFields) {
    if (!value) continue;

    if (!userEmail && typeof value === 'string' && value.includes('@')) {
      userEmail = value;
      continue;
    }

    if (!device) {
      try {
        const parsed = JSON.parse(value);
        if (parsed && typeof parsed === 'object') device = parsed;
      } catch (e) {}
    }
  }

  if (!userEmail || !device) continue;

  const personnelId = personnelMap[userEmail];
  if (!personnelId) continue;

  device.personnelId = personnelId;
  results.push({ json: device });
}

return results;
A few things worth noting here. The custom field detection is content-based — it finds the email by looking for @ and the device by checking which field parses as a JSON object. This is intentional. The original version used hardcoded array indices (data[0], data[1]) which would silently break if Level.io ever reordered the fields. Don’t do that.
The continue statements handle all the filtering inline. Devices with no custom fields, missing emails, unparseable JSON, or no matching Drata personnel are all silently skipped. No separate Filter node needed.
Posting to Drata
The final HTTP Request POSTs each device payload to Drata’s custom connection endpoint. I added batching here too (5 requests, 1 second interval) because slamming Drata’s API with your entire device fleet at once seemed like a bad idea.
Things To Watch Out For
Level.io device pagination. The workflow currently fetches 100 devices with no pagination. If you have more than 100 devices, you’ll need to add cursor-based pagination to that request. Don’t ask me how I found out.
Custom field names. The content-based detection is more robust than index-based, but if you have a custom field value that happens to contain an @ symbol and isn’t an email, you might get unexpected matches. In practice this hasn’t been an issue, but it’s worth knowing.
Personnel mismatches. If the email in Level.io doesn’t exactly match the email in Drata (casing, alias, etc.), the lookup will miss it. The workflow skips these silently. You might want to add .toLowerCase() on both sides if casing is inconsistent in your environment.
The Files
I’ve published both the n8n workflow JSON and the PowerShell script as a gist:
To import the workflow, go to your n8n instance and paste the JSON. You’ll need to set up three credentials:
- Drata Bearer Auth (personnel read scope) for fetching personnel
- Drata Bearer Auth (custom connection write scope) for posting devices
- Level.io API Key as an HTTP Header credential
Update the custom connection ID in the POST URL to match yours (/custom-connections/YOUR_ID/devices), set the schedule trigger to whatever cadence makes sense for you, and you’re good to go.
Wrapping Up
Is this the most elegant compliance automation pipeline in the world? Probably not. But it works, it runs on a schedule, and it replaced a manual process that nobody wanted to do. If you’re in the same boat with Drata and Level.io, hopefully this saves you some time.